Leaderboard


Popular Content
Showing content with the highest reputation on 05/17/17 in all areas
-
This is a plugin that will create a per share .Recycle.Bin folder on each smb share for files deleted on that share. Built into samba is a module called "vfs recycle" that handles the deletion of files. This plugin manages the vfs recycle settings using smb-shares.conf and starts and stops vfs recycle. Basically samba is restarted with the smb-shares.conf file configured for vfs recycle. The reason the folder name of .Recycle.Bin was chosen is so the recycle bin is a hidden folder. This is the normal way a recycle bin works. The way vfs recycle works when a file is deleted is to move the file pointers (directory information) to the .Recycle.Bin folder on the same share where the file is located. Each share will have its own .Recycle.Bin folder where the files deleted from that share are located. The .Recycle.Bin folder is created when a file on that share is deleted. A .Recycle.Bin folder per share is created and contains all deleted files for that share. This deleted file organization can be modified in the WebUI. You can set parameters to organize deleted files by user or machine and then the file structure after that. The deleted files can then be recovered as necessary by browsing to //Tower/share/.Recycle.Bin. You can also optionally set up an empty trash event (Hourly, Daily, or Weekly) that will delete files older than a configurable number of days. Deleted files are dated when they are deleted and not by their original date. You can click on a "Remove Aged Files" button on the WebUI and deleted files will be removed based on the aged days setting. You can make the .Recycle.Bin folder visible in the shares by setting 'Hide "dot" files' to no in the smb settings. You can then browse the .Recycle.Bin folders. If the folder is not visible, you can browse to it by using //Tower/share/.Recycle.Bin. I recommend setting up the weekly cron and set the age days to something that makes sense for you (default is 7 days). That will keep the .Recycle.Bin folder from getting out of hand. Note: Shares will not show up when browsing the Recycle Bin from the WebUI unless there is a .Recycle.Bin folder on that share. Click on the 'Help' button on the upper right of the menu bar and you will get explanations of the settings. The preferred way to install the plugin is using Community Applications or you can cut and paste this link into the "Install Plugin" line to install the plugin: https://github.com/dlandon/recycle.bin/raw/master/recycle.bin.plg Note: Be sure to remove any older plugin (prior to V6.3) before installing this new version. Note: If you remove the plugin, the .Recycle.Bin share folders will not be emptied. If you want to permanently remove the plugin, you need to empty the trash before removing the plugin. Excluding Shares Enter the share names to exclude from the recycle bin. You can treat these names as wild cards. Any share that has the text that is in the excluded share will be removed, unless single quoted. If the share name is single quoted, the share must match exactly to be excluded. Example: Shares: Joe Files Sam Files My Files Setting exclude to 'Files' (without quotes) will exclude all three shares. To exclude 'My Files' only set the exclude to 'My Files' (without quotes). Note: You should exclude the appdata and system shares because there is no reason to have a recycle bin on those shares and it may create more samba activity than the recycle bin can handle if there is a lot of samba delete activity on those shares. Excluding Directories You can exclude directories similar to excluding Shares. To exclude a directory from all shares (including UD mountpoints): directory To exclude a directory from a particular share: share/directory The full /mnt/user/ path is not necessary. To exclude a directory from a UD share: mountpoint/directory The full /mnt/disks/ path is not necessary. Credits: This plugin is based on the previous work of Influencer done back in the V5 days.1 point
-
Ransomware Protection This plugin is a specialized type of anti-virus designed to detect if a ransomware malware attack is happening on your server, and upon detection either take the server offline, or make all of your user shares read-only. It operates by using "bait files". These bait files can either be located within you normal user shares, or within specialized bait shares. Once an attack happens on one of the bait files, (either the contents are changed (ie: encrypted) or deleted (ie: renamed and encrypted), the plugin will take whatever action you specify. Response time is approximately 1/10th of a second. Full details on the setup and operation of the plugin are contained within the "Help" tab on the plugin's settings page You can install this plugin via Community Applications (the Apps tab) within the Plugins section (or just search for ransonware). This plugin requires unRaid 6.2+1 point
-
Western Digital is introducing their 10 TB HDD RED series (designed for NAS use). Who's going to buy it? Link to the source article https://www.wdc.com/products/internal-storage/wd-red.html#WD100EFAX1 point
-
I usually use 101 test points for this purpose, it tests each disk every 2%, my last one with this problem:
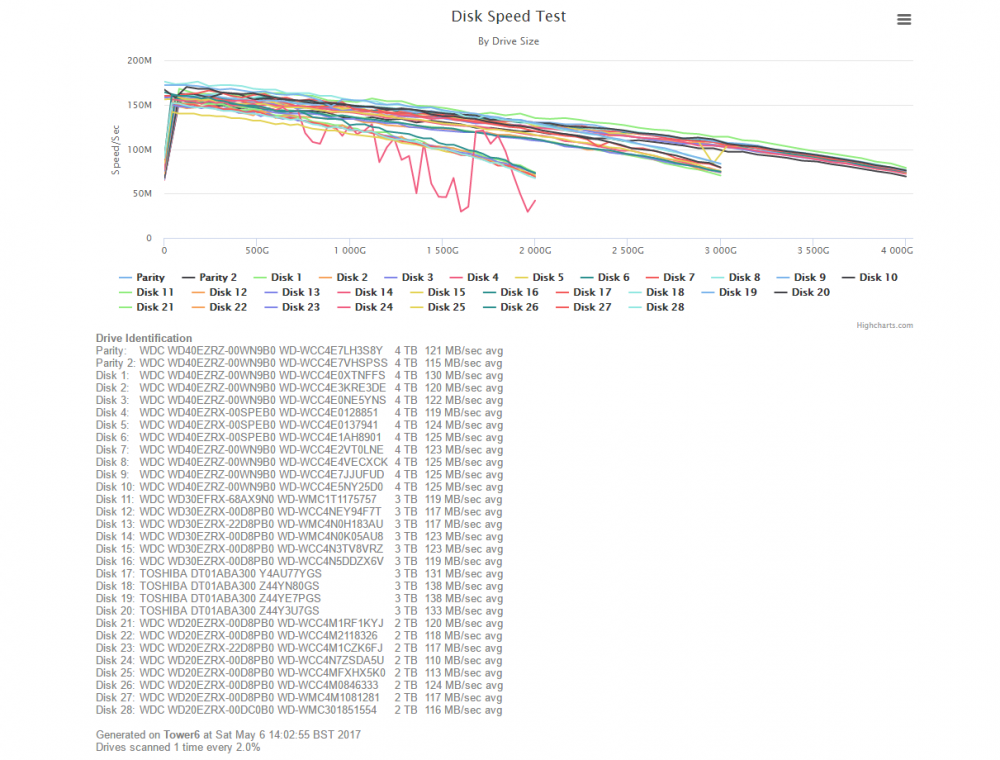 1 point
 -
Remote access of a router should be banished in my opinion. One of the parts of my network I'll never expose to any form of remote admin....1 point
-
I hope we get 4.10 kernel soon, that threadripper is good too to ignore1 point
-
unRAID will make sure <min free> space is on a disk BEFORE copying a new file to that drive. Maybe should have been called "Min Free to Copy". The drive will be considered "full" when the available space is LESS than this number. (Hard to get less than 0 ) There are reasons you might not want to fill up a disk too much. For certain types of recovery, it would be helpful to have some space to work with. If you request double the size of the largest file, the last copy will take up some part of that, leaving at least enough space for one additional large file. Thought I would mentioned that min free is ignored if the split level is set to require all files for a folder to stay on one disk, unRAID will attempt to copy the file to that disk regardless of free space. This can be useful. For example, some people try to keep all episodes of a TV Show (or Season) on one disk, and use split levels to make sure that happens. In such a case, you might set quite a large min free, e.g, 100G, which would basically only come into play when selecting a location for a new show or season. If more than 100G is not available, then another target disk wold be selected for the new show. This leaves 100G for additional episodes for shows already on that disk to continue to be added.1 point
-
Run the command mdcmd status It will generate a long list of status info. Of particular interest to parity checks (and I assume drive rebuilds) are the following ... mdResyncPrcnt mdResyncFinish mdResyncSpeed mdResyncPos1 point
-
Yup or change it under advanced settings under vm manager in the settings tab. Either will work and reboot.1 point
-
My gut instinct is to disconnect disk1, start the array degraded and see if parity actually agrees with what's on the physical disk1. At the very least you would then have 2 copies of the data to try a recovery. Ideally you could then rebuild to a new drive to get the array back protected, and try data retrieval on the removed disk. Do you have backups? How much time and money is the data on disk1 worth?1 point
-
Parity is showing green which is a good sign. If you want to try you can rebuild your drive, or get a new drive. Before you do either, shut down and reseat cables on disk 1 and on motherboard. I'll have to defer to Turl or someone for a deep dive into diagnostics. Let's hold on steps right now for recovery and verify cabling. Grab one more diag and save it somewhere. Stop the array, change setting auto start array to no in settings under disk settings and shutdown and reseat cabling and turn back on. Then we hold... The disk being green balled on disk 1 makes me hesitant on a rebuild from parity right now.1 point
-
I guess if you measure its outputs with an oscilloscope under different loads to check ripple and general quality of the signal, as well as deviation from expected output, you could be suitably impressed by a PSU. Or maybe it's nicely lit and has an LED readout telling you how much power you're using... not performance related, but lights and gizmos generally impress on a subconscious level if nothing else!1 point
-
Oooh, good call BRiT. I'll start playing around with that. This could prove useful at work where I use unRAID for video archives. Lots of students using all sorts of computers and OS's doing who knows what, and some of them have brief access to the primary archive server to drop on their newly-finished masterpieces. If all the previous works were root-owned and RO that could potentially save days of rsyncing from the backup server if something unsavoury happened. Cheers!1 point
-
What do the shares show? My guess is appdata lived on disk 1. What does MC show from putty or unraid boot to GUI? Midnight commander you'd back out to /mnt/disk1. Looks like old school dos shell. Take a peek in there. Who knows your data data may be there but the state it was in when doing the xfs repair might need a reboot to reset the shares back. Report back on what shows in /mnt/disk1 first before going that route. Based on your info will push us one direction or rebuild of disk1.1 point
-
Go to docker settings and see if you appdata location is valid first. Reason you can't see it likely is the docker.img file was corrupted or not found. Do you only have the 2 drives? If so your parity is actually a raid 1 mirror rather than just a non file system parity calculation. Whatever you do any parity rebuild until you confirm configuration with the community prior to problem. This includes drive counts. I don't want you overwriting parity/mirror data if nothing is seen on your drive.1 point
-
Alternately to tdallen's suggestion, if all your "empty" drives are in fact 3TB at the moment, you can use your two Blues as data, and the empty 3TB Red as single parity and have the benefit of parity protection while you're transferring from your other NAS. When all your files are safely onto your unRAID server you can preclear one of the Zyxel drives to be used for another data drive, and designate the last Zyxel drive as second parity. I don't suspect there's much difference between Red and Blue in terms of overall longevity, but I'd guess the Blue's 2 year warranty versus Red's 3 year means using Blue for unchanging data and Red for parity would offer the longest lifespan overall.1 point
-
Hi, it's great that you're ready to setup your server - but this doesn't sound quite right, let me ask some questions. In your inventory of parts you don't mention a 1TB drive, but in your steps you do. Is that part of the equation? Also, how much data do you have on the Zyxel NAS? Here's the thing, if you have 3 or 4 or 6TB of data on the Zyxel NAS and you want to copy it to unRAID, you will need the same amount of space on your unRAID server. And, unfortunately, you can't use the Blue drives for that purpose. Parity drives are unique - they store parity information, not data. Also, if designate a drive as parity when it already has data on it, the data will be wiped out - there's no auto-magic migration of data. So based on what you have above, the strategy that seems like it would work is to setup your unRAID server with the two Blues as data drives (and any other drives you want to use as data). Once all the data is copied over then install the WD Reds and designate them as parity. Not what you wanted, but it would work if I understand your situation. There might be other options if the Zyxel NAS isn't full. For copying, use Community Applications to install the Unassigned Devices plugin and then mount the Zyxel NAS directly on your unRAID server. That will allow you to use Midnight Commander for the copy operation. Oh, and yes - the 60GB SSD should make a good cache drive based on the assumption that you will use it primarily for Dockers. No pre-clear is required.1 point
-
It's not an issue of how much music you have -- it's a function of if you have two shares on different disks that happen to be on the same controller and that controller has the "stall while drives are spinning up" characteristic. Suppose you have all your movies on one disk; all you music on another. Someone in the house is watching a movie; and you decide to play some music. When you start the music, the disk with your music share needs to spin up -- and this could cause the movie to "freeze" while that disk was spinning up. [The opposite could also be true -- if somebody was listening to music and then a movie was started the music would stop for a few seconds.] This is what spin-up groups can prevent.1 point
-
Add this to smb extra configuration- veto files = /._*/.DS_Store/ Will stop OSX from creating ds store files via samba.1 point
-
I think our server might be down atm. It was last night. Sent from my LG-H815 using Tapatalk1 point
-
But then you're vulnerable to a cylon attack. Sent from my LG-D852 using Tapatalk1 point
-
One key thing that really adds to the value is the free upgrades => while it's certainly not guaranteed for the future, it's true that UnRAID has NEVER charged for a version upgrade ... even as the feature set has grown significantly.1 point
-
I'm trying to run Cache Directories from the GUI using "-a" but it looks like the GUI can't handle quotation marks. Here is the line I am trying to add: -a '-noleaf \( -name "Folder 1" -prune -o -name "Folder 2" -prune -o -name "Folder 3" -prune \) -o -print' Can this be addressed, or is there a better way to run this?1 point