Leaderboard


Popular Content
Showing content with the highest reputation on 04/20/17 in all areas
-
That is the solution without deactivating your Avast Firewall completely!2 points
-
How to setup Dockers to have own IP address without sharing the host IP address: This is only valid in unRAID 6.3 series going forward. 6.4.0 has this built into the GUI but currently have a limitation of needing extra IP addresses for each of your interfaces and needs to delete all manually created docker networks. If you don't like that, you can opt to create the network manually like here and disable the docker network auto cleanup. 6.4.1 is now more intelligent about this and presents a relatively powerful UI that covers most simple cases. You don't need to assign unnecessary IP address to additional interfaces anymore. refer to https://lime-technology.com/forums/topic/62107-network-isolation-in-unraid-64/ for more details Single NIC only: Some assumptions: We'll be using a shared interface br0 (This allows us to use the same nic with virtual machines, otherwise its alright to use eth0) The IP address details are: unRAID = 192.168.1.2 Gateway/router = 192.168.1.1 Subnet = 192.168.1.0/24 Docker IP pool = 192.168.1.128/25 (192.168.1.128-254) A new docker network will be established called homenet Login via SSH and execute this: # docker network create \ -o parent=br0 \ --driver macvlan \ --subnet 192.168.1.0/24 \ --ip-range 192.168.1.128/25 \ --gateway 192.168.1.1 \ homenet Modify any Docker via the WebUI in Advanced mode Set Network to None Remove any port mappings Fill in the Extra Parameters with: --network homenet Apply and start the docker The docker is assigned an IP from the pool 192.168.1.128 - 192.168.1.254; typically the first docker gets the first IP address # docker inspect container | grep IPAddress "SecondaryIPAddresses": null, "IPAddress": "", "IPAddress": "192.168.1.128", # docker exec container ping www.google.com PING www.google.com (122.2.129.167): 56 data bytes 64 bytes from 122.2.129.167: seq=0 ttl=57 time=36.842 ms 64 bytes from 122.2.129.167: seq=1 ttl=57 time=36.496 ms ^C # docker exec container ping 192.168.1.2 PING 192.168.1.2 (192.168.1.2): 56 data bytes ^C # At this point, your gateway/router will have a first class network citizen with the specified IP address An additional Extra Parameter can be specified to fix the IP address: --ip 192.168.1.128 The container will not be allowed to talk to unRAID host due to the underlying security implementation with the macvlan driver used by Docker. This is by design That's it. Secondary NIC is available: Some assumptions: We'll be using a dedicated interface br1 (the native eth1 interface can used here too) There is no IP address assigned to the interface The IP address details are: Gateway/router = 10.0.3.1 Subnet = 10.0.3.0/24 Docker IP pool = 10.0.3.128/25 (10.0.3.128-254) A new docker network will be established called docker1 unRAID has an ip of 10.0.3.2 Login via SSH and execute this: # docker network create \ -o parent=br1 \ --driver macvlan \ --subnet 10.0.3.0/24 \ --ip-range 10.0.3.128/25 \ --gateway 10.0.3.1 \ docker1 Modify any Docker via the WebUI in Advanced mode Set Network to None Remove any port mappings Fill in the Extra Parameters with: --network docker1 Apply and start the docker The docker is assigned an IP from the pool 10.0.3.128 - 10.0.3.254; typically the first docker gets the first IP address # docker inspect container | grep IPAddress "SecondaryIPAddresses": null, "IPAddress": "", "IPAddress": "10.0.3.128", # docker exec container ping www.google.com PING www.google.com (122.2.129.167): 56 data bytes 64 bytes from 122.2.129.167: seq=0 ttl=57 time=36.842 ms 64 bytes from 122.2.129.167: seq=1 ttl=57 time=36.496 ms ^C # docker exec container ping 10.0.3.2 PING 10.0.3.2 (10.0.3.2): 56 data bytes 64 bytes from 10.0.3.2: seq=0 ttl=64 time=0.102 ms 64 bytes from 10.0.3.2: seq=1 ttl=64 time=0.075 ms 64 bytes from 10.0.3.2: seq=2 ttl=64 time=0.065 ms 64 bytes from 10.0.3.2: seq=3 ttl=64 time=0.069 ms ^C --- 10.0.3.2 ping statistics --- 4 packets transmitted, 4 packets received, 0% packet loss round-trip min/avg/max = 0.065/0.077/0.102 ms At this point, your gateway/router will have a first class network citizen with the specified IP address An additional Extra Parameter can be specified to fix the IP address: --ip 10.0.3.128 The container can happily talk to unRAID as the packets go out via br1 and talk to the host on br0 That's it. Some caveats: With only a single NIC, and no VLAN support on your network, it is impossible for the host unRAID to talk to the containers and vice versa; the macvlan driver specifically prohibits this. This situation prevents a reverse proxy docker from proxying unRAID, but will work with all other containers on the new docker network. We can only have one network defined per gateway. So if you already have docker network br0 on your main LAN (gateway 192.168.1.1), docker will not allow you to create another network referencing the same gateway. I cannot confirm yet what happens in the case of two or more NICs bridged/bonded together (but it should be the same as a single NIC) unRAID 6.4.0 We need to disable the docker network auto generation and cleanup if we want these settings to remain (until the auto cleanup is made more intelligent). The code below should be inserted into the go file before /usr/local/sbin/emhttp is started. The code below will disable docker network auto creation too, so it will behave like 6.3.5. It seems that the docker page will happily show any docker network you have defined, so you can just use them as normal and no longer need to set Extra Parameters. Again not needed with 6.4.1 going forward. # stop docker network creation and pruning sed -i -e '/# cleanup/,+3s/^/## /;s/^ custom_networks/## custom_networks/' /etc/rc.d/rc.docker
 1 point
 -
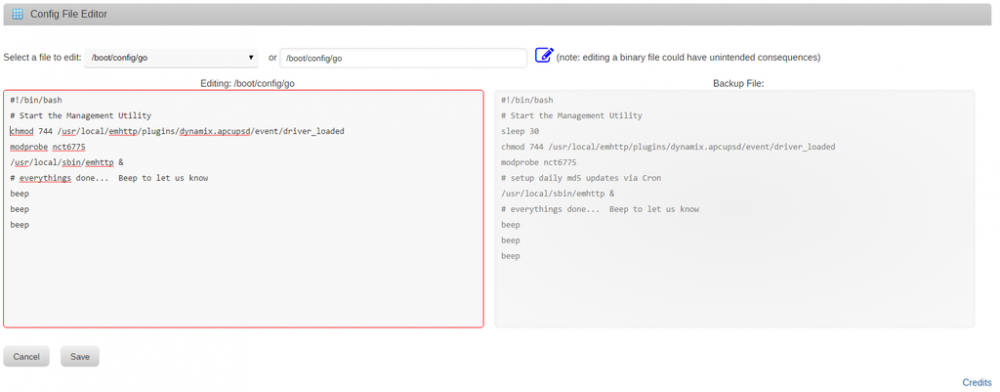
CA Config Editor A simple plugin to allow you to easily edit any of unRaid's configuration files (or actually any file on your server) within your browser without having to go to the command line. (including syslinux.cfg) While most of unRaid's settings are available to be modified within its webUI, there are some cases where it is required / desired to manually edit them. This plugin will allow you to do that. Backups of files edited are automatically created (filename.bak), and can be restored by copying from the backup window. Additionally, any file present on your server in any folder can also be edited beyond the .cfg files that shortcuts are available for. This is helpful for when a docker application requires you to make some changes within its config files in the appdata folder, but either permissions prevent you from doing this over the network, or you're not familiar with the command line. The usual warnings apply: Changes to the configuration files could have unintended results if you enter in wrong values. Install it via the Apps Tab (where else?). Either go to the CA Modules section, or search for Config and scroll down to CA Config Editor. Once installed, you can find the plugin within the Tools tab.
 1 point
 -
Provider is wrong, you have it set to pia, it should be custom. Keep in mind your ovpn and certs will of been deleted because of this and pia ones put there instead, so you will need to download the ipvanish ones again once you have corrected the provider issue and delete the pia ones located in /config/openvpn/ Sent from my SM-G900F using Tapatalk1 point
-
No, it seems your issue is different from mine. According to your post it will take 30+ seconds for the page to respond. Mine wouldn't respond at all, and eventually time out. This was happening on multiple computers (with or without antivirus) and every browser under the sun. However, referring back to my earlier post, my issue seems to be resolved after disabling Global C-state Control in the bios. This is a known workaround for ryzen instability issues with unraid. This thread can be closed as I'm pretty sure my issue is resolved. Kind of early to tell for sure, but approaching 24 hours of up time which is a first for this server. Thanks for the help guys.1 point
-
Why is my GUI Slow and/or unresponsive? This problem has been traced to an anti-virus program suite and its settings in several cases. The link below will take to two posts which provide a rather complete descriptions of the problem and its solution. While you might not be running Avast, I have no doubt that other antivirus products will have a similar issue in the future. You should definitely investigate this area if you are having any type of problem with a slow, misbehaving or unresponsive GUI. EDIT: Keep reading in the thread as there is continuing investigation into the issues with Avast.1 point
-
I deactivated Adblock Plus in Firefox with no noticeable improvement and i tried the same in Chrome, but the GUI still gets unresponsive. I'm running a Avast Internet Security Suite and i had problems with that AV and my VMs before. Guess what!? I deactivated the Anti Virus and everything runs flawless! The GUI got unresponsive because of my Avast Antivirus! THANKS Bonienl, i love you!1 point
-
Here's one report relevant to your question, looks like @jonp one of the LimeTech staff are onto the problem, hopefully now I've pinged him he'll be able to update you some more on the current state of play.1 point
-
Do you have an adblocker or anti-virus program running? These are known to interfere with the GUI. Causing pages not to load or to load very slow.1 point
-
I am not sure what is going on. One thing that might help would be a diagnostics file from that fresh install of 6.3.3. IF you have a monitor and keyboard installed on your server, you might try the boot option with the GUI mode and see if the GUI is operation on that monitor. Try running the htop from the command line and see if there are any processes that are consuming all of the CPU cycles. Also check in that display that emhttp process is running. ( emhttp should be at the end of the command line- not in the middle. That is the process that provides the GUI.)1 point
-
What unRAID does for NAS that no others do is offer ease of capacity expansion. You can add any size drive you want at any time (regarding that your parity drive is at least as large as any of your data drives). This negates the need to match a bunch of the same drives together when what you're looking for is oodles of storage, and so saves cost when upgrade time comes. The downside is (generally) you're using one or two disks at a time with unRAID, and this means your data flow is limited by the max transfer rates of a single drive (or multiple drives if your files are spread across them evenly). FreeNAS and others give you more bandwidth by striping multiple data paths together for higher throughput at the cost of requiring same size disks for each member, and so greater cost and lower upgrade flexibility. So in making the decision between the two (specifically, because you mentioned them both) you need to consider whether data transfer rates will be a limiting factor for your use case, and how you will solve that issue if yes. However, beyond that perhaps more importantly is how concerned you are for the safety of your data. When you get into large volumes (above 10 or 12TB) you really need to consider traditional RAID level limitations (RAID5 or RAID6 or even ZFS variations on those themes) which are only really good up to that volume size (http://www.zdnet.com/article/why-raid-6-stops-working-in-2019/, among other similar articles all over the Internet). Beyond that you are tempting fate to the point where you may win the lottery sooner than you'll escape data loss with RAID5 or RAID6. With unRAID the risks are nowhere near as high because each data disk is its own separate file system that is simply unified for ease of file management, and XOR'd onto one or two parity drives for protection. The end result is, as long as you keep on top of drive faults and other hardware failures, your data are much less likely to fall off the edge of the earth. If catastrophe should ensue, and you lose more than one drive at the same time with unRAID, you still have all your other drives' worth of data intact, awaiting your enjoyment. In my own experience I have only lost data from my unRAID arrays because I hit the DELETE key when I shouldn't have. In nearly 10 years, I'd say that's a solid recommendation. I cannot say the same for any of my RAID5 or RAID6 arrays I have used over the years, unfortunately. I never trust them without full backups of all data.1 point
-
I found that Cache was not enabled for the share I am transfering to. After enabling cache I am seeing transfers from 40MB/s to 130MB/s However it is only using 1 SSD cache. I have 2 SSD's on cache. I am thinking of setting the 2 ssds in raid 0 and making a single cache drive.1 point
-
New config does not rebuild the links to the user share. What it does is remove that disk from the inventory (for the lack of a better word) of the array disks and forces the rebuild of parity. (A user share is the top level name of any folder on any disk that is in the array. Any file that is inside of any top-level folder is in that user share automatically.)1 point
-
I use Midnight Commander (mc from the command line) for these tasks. You want to use disk shares for this work - i.e. you are copying/moving from /mnt/disk2 to /mnt/disk1 . After all your data is consolidated on disk1 (or whichever disk you are consolidating onto) then you will need to do a new config and redefine the array without the disk you are removing.1 point
-
That's not true - i just tried to make new unRAID VM under VmWare Workstation on Ubuntu as host. unRAID boots up ok with plopkexec, and then i successfully registered a trial version - this would not be possible with flash GUID missing..1 point
-
How can I stop mover from running? (Possibly unRaid 6.3.3+ only) Since you can't stop the array while mover is running, in order to stop mover either from an SSH terminal or from the local keyboard / monitor, enter in the following mover stop Reference:1 point
-
Avast appears to be the issue. Quick solution for me was... Firewall > Policies > Preferences > Turn on 'Allow all connections with Friends when in Private mode' Then go to... Firewall > Friends > See that the IP Address range for your router is listed See that Avast uses a From & To range as two columns The typical setting should be a 'From' range of 192.168.1.0 & 'To' range of 192.168.1.255 If you configured your router to use a different range you need to input it at this window.1 point


