Leaderboard


Popular Content
Showing content with the highest reputation on 03/13/17 in all areas
-
you could assign individual ip address.. and configure each client. or just go to settings>network sexting and change to a bonding mode that fits your network and let the server do the load balancing. ------ mode=1 (active-backup) Active-backup policy: Only one slave in the bond is active. A different slave becomes active if, and only if, the active slave fails. The bond's MAC address is externally visible on only one port (network adapter) to avoid confusing the switch. This mode provides fault tolerance. The primary option affects the behavior of this mode. mode=2 (balance-xor) XOR policy: Transmit based on [(source MAC address XOR'd with destination MAC address) modulo slave count]. This selects the same slave for each destination MAC address. This mode provides load balancing and fault tolerance. mode=3 (broadcast) Broadcast policy: transmits everything on all slave interfaces. This mode provides fault tolerance. mode=4 (802.3ad) IEEE 802.3ad Dynamic link aggregation. Creates aggregation groups that share the same speed and duplex settings. Utilizes all slaves in the active aggregator according to the 802.3ad specification. Pre-requisites: Ethtool support in the base drivers for retrieving the speed and duplex of each slave. A switch that supports IEEE 802.3ad Dynamic link aggregation. Most switches will require some type of configuration to enable 802.3ad mode. mode=5 (balance-tlb) Adaptive transmit load balancing: channel bonding that does not require any special switch support. The outgoing traffic is distributed according to the current load (computed relative to the speed) on each slave. Incoming traffic is received by the current slave. If the receiving slave fails, another slave takes over the MAC address of the failed receiving slave. Prerequisite: Ethtool support in the base drivers for retrieving the speed of each slave. mode=6 (balance-alb) Adaptive load balancing: includes balance-tlb plus receive load balancing (rlb) for IPV4 traffic, and does not require any special switch support. The receive load balancing is achieved by ARP negotiation. The bonding driver intercepts the ARP Replies sent by the local system on their way out and overwrites the source hardware address with the unique hardware address of one of the slaves in the bond such that different peers use different hardware addresses for the server.2 points
-
Hi guys Heres a tutorial on how to setup the excellent Rclone plugin on unRAID. You will see how to install it then connect to 3 different cloud storage providers. Amazon, dropbox and google drive. You will see how to encrypt and decrypt files in the cloud. You will see how to connect a docker container to rclone and even stream and encrypted media file to emby or plex. You will then see how to make the rclone mount into a network share. Finally, you will see how to easily sync a folder to the cloud.2 points
-
Application Name: Sonarr Application Site: https://sonarr.tv/ Docker Hub: https://hub.docker.com/r/linuxserver/sonarr/ Github: https://github.com/linuxserver/docker-sonarr Please post any questions/issues relating to this docker you have in this thread. If you are not using Unraid (and you should be!) then please do not post here, instead head to linuxserver.io to see how to get support.1 point
-
There have been several posts on the forum about VM performance improvements by adjusting CPU pinning and assignments in cases of VMs stuttering on media playback and gaming. I've put together what I think is the best of those ideas. I don't necessarily think this is the total answer, but it has helped me with a particularly latency sensitive VM. Windows VM Configuration You need to have a well configured Windows VM in order to get any improvement with CPU pinning. Have your VM configured as follows: Set machine type to the latest i440fx.. Boot in OVMF and not seaBIOS for Windows 8 and Windows 10. Your GPU must support UEFI boot if you are doing GPU passthrough. Set Hyper-V to 'yes' unless you need it off for Nvidia GPUs. Don't initially assign more that 8 GB of memory and set 'Initial' and 'Max' memory at the same value so memory ballooning is off. Don't assign more than 4 CPUs total. Assign CPUs in pairs to your VM if it supports Hyperthreading. Be sure you are using the latest GPU driver. I have had issues with virtio network drivers newer than 0.1.100 on Windows 7. Try that driver first and then update once your VM is performing properly. Get the best performance you can by adjusting the memory and CPU settings. Don't over provision CPUs and memory. You may find that the performance will decrease. More is not always better. If you have more than 8GB of memory in your unRAID system, I also suggest installing the 'Tips and Tweaks' plugin and setting the 'Disk Cache' settings to the suggested values for VMs. Click the 'Help' button for the suggestions. Also set 'Disable NIC flow control' and 'Disable NIC offload' to 'Yes'. These settings are known to cause VM performance issues in some cases. You can always go back and change them later. Once you have your VM running correctly, you can then adjust CPU pinning to possibly improve the performance. Unless you have your VM configured as above, you will probably be wasting your time with CPU pinning. What is Hyperthreading? Hyper threading is a means to share one CPU core with multiple processes. The architecture of a hyperthread core is a core and two hyperthreads. It looks like this: HT ---- core ---- HT It is not a base core and a HT: core ---- HT When isolating CPUs, the best performance is gained by isolating and assigning both pairs for a VM, not just what some think as the '"core". Why Isolate and Assign CPUs Some VMs suffer from latency because of sharing the hyperthreaded cpus. The method I have described here helps with the latency caused by cpu sharing and context switching between hyperthreads. If you have a VM that is suffering from stuttering or pauses in media playback or gaming, this procedure may help. Don't assign more cpus to a VM that has latency issues. That is generally not the issue. I also don't recommend assigning more than 4 cpus to a VM. I don't know why any VM needs that kind of horsepower. In my case I have a Xeon 4 core processor with Hyperthreading. The CPU layout is: 0,4 1,5 2,6 3,7 The Hyperthread pairs are (0,4) (1,5) (2,6) and (3,7). This means that one core is used for two Hyperthreads. When assigning CPUs to a high performance VM, CPUs should be assigned in Hyperthread pairs. I isolated some CPUs to be used by the VM from Linux with the following in the syslinux configuration on the flash drive: append isolcpus=2,3,6,7 initrd=/bzroot This tells Linux that the physical CPUs 2,3,6 and 7 are not to be managed or used by Linux. There is an additional setting for vcpus called 'emulatorpin'. The 'emulatorpin' entry puts the emulator tasks on other CPUs and off the VM CPUs. I then assigned the isolated CPUs to my VM and added the 'emulatorpin': <cputune> <vcpupin vcpu='0' cpuset='2'/> <vcpupin vcpu='1' cpuset='3'/> <vcpupin vcpu='2' cpuset='6'/> <vcpupin vcpu='3' cpuset='7'/> <emulatorpin cpuset='0,4'/> </cputune> What ends up happening is that the 4 logical CPUs (2,3,6,7) are not used by Linux but are available to assign to VMs. I then assigned them to the VM and pinned emulator tasks to CPUs (0,4). This is the first CPU pair. Linux tends to favor the low numbered CPUs. Make your CPU assignments in the VM editor and then edit the xml and add the emulatorpin assignment. Don't change any other CPU settings in the xml. I've seen recommendations to change the topology: <cpu mode='host-passthrough'> <topology sockets='1' cores='2' threads='2'/> </cpu> Don't make any changes to this setting. The VM manager does it appropriately. There is no advantage in making changes and it can cause problems like a VM that crashes. This has greatly improved the performance of my Windows 7 Media Center VM serving Media Center Extenders. I am not a KVM expert and this may not be the best way to do this, but in reading some forum posts and searching the internet, this is the best I've found so far. I would like to see LT offer some performance tuning settings in the VM manager that would help with these settings to improve performance in a VM without all the gyrations I've done here to get the performance I need in my VM. They could at least offer some 'emulatorpin' settings. Note: I still see confusion about physical CPUs, vcpus, and hyperthreaded pairs. CPU pairs like 3,7 are two threads that share a core. It is not a core with a hyperthread. When isolating and assigning CPUs to a VM, do it in pairs. Don't isolate and assign one (3) and not its pair (7) unless you don't assign 7 to any other VM. This is not going to give you what you want. vcpus are relative to the VM only. You don't isolate vcpus, you isolate physical CPUs that are then assigned to VM vcpus.1 point
-
Application Name: SABnzbd Application Site: http://sabnzbd.org/ Docker Hub: https://hub.docker.com/r/linuxserver/sabnzbd/ Github: https://github.com/linuxserver/docker-sabnzbd Tags You can choose, by using a tag, to use the unstable branch. Stable is the default and requires no tag (at times both branches may have the same version, but the stable/latest branch should never contain an alpha/beta/rc version) Add the tag, if required, to the linuxserver/sabnzbd line of the run/create command in the following format:- linuxserver/sabnzbd:unstable Please post any questions/issues relating to this docker you have in this thread. If you are not using Unraid (and you should be!) then please do not post here, instead head to linuxserver.io to see how to get support.1 point
-
Hi guys, this is a simple plugin that allows users to clear their disks before add them to the array. The main characteristics of this plugin are: Modularity: can be used standalone or in conjunction with Joe L. or bjp999 scripts; Ease of use: with a few clicks you can start a clear session on your disk; Integration: you can always access the plugin under Tools > Preclear Disk menu. If you have Unassigned Devices installed, you can start/stop/view preclear sessions directly from Main > Unassigned Devices. All dependencies included: you don't need SCREEN to run a preclear session in the background; all jobs are executed in the background by default, so you can close your browser while the preclear runs. You can install it directly or via Community Apps. Q & A: Q) Why Joe L. or bjp999 scripts are not included? A) I'm not authorized by Joe L. to redistribute his script, so you need to download a copy from the topic above and put it under /boot/config/plugins/preclear.disk/ renaming it to preclear_disk.sh if necessary. bjp999 modifications are unofficial, so I decided not to include it by default. A) the bjp999 script is now included by default. Q) By default, I see a "gfjardim" script always available. Why? A) Since I'm not authorized to redistribute Joe L. script and the recent slow support by the author, I decided a major code rewrite in the script was needed. The new script is being actively supported, compatible with unRAID notifications, is faster than bjp999 script and has a cleaner output so users can easily visualizes what's going on with their disks. Q) I want to use one of the older scripts(Joe L. or bjp999) in conjunction with notifications. Is that possible? A) Yes. I've made some adjustments on both scripts so they become compatible with unRAID notifications; Joe L. version can be found here and bjp999 can be found here. A) the bjp999 script is now included by default; it includes support for Unraid notifications. Q) Is there any howtos available? A) gridrunner made a awesome video explaining why preclearig a hard disk is a good idea, and how you can accomplish that: Q) The plugin asked me to send some statistics information. How does the statistics report system work? Is it safe? Is it anonymous? A) To better track the usage of the plugin, a statistics report system was put in place. The main goals I intend to archive are: know number of disks that gets precleared; fix any silent bugs that gets reported on the logs; know average size of disks, their model, their average speed and elapsed time we should expect from that model; success rate; rate of disks with SMART problems; This system is totally optional and users will get prompted if they want to send each report. It is also safe and totally anonymous, since all data is sent to Google Forms and no identifying data is exported, like disks serial numbers. Detailed info can be found here. The statistics are public and can be found here. Q) How can I download a copy of the plugin log? A) Please go to Tools, then Pleclear Disk, and click on the Download icon: Q) Which are the differences between Erase and Clear? A) The Clear option uses zeroes to fill the drive; at the end, the drive can be added to the array the array immediately. The Erase All the Disk option uses random data to wipe out the drive; the resulting drive can't be quickly added to the array. If you want to add if after erase, you must select Erase and Clear the Disk. Troubleshooting: Q) After Zeroing the disk, the Post-Read operation fails saying my drive isn't zeroed. A) When zeroing the disk, the script uses a zero filled data stream produced by the pseudo-device /dev/zero. If a Post-Read fails just after a Zeroing operation, chances are that you have bad RAM memory, or less frequently bad PSU, bad cables or bad SAS/SATA card. Please run some rounds of MEMTEST on your machine to test your RAM modules. Q) A Pre-Read operation failed and I see Pending Sectors on the SMART report. A) Pending Sectors will lead to read errors, and the Pre-Read operation will fail. To force the hard drive firmware to remap those sectors, you have to run a Preclear session with the Skip Pre-Read option checked. Q) I've lost communication with the webgui, can I manage preclear sessions from the terminal? A) Yes, you can. If you lost communication with the webgui or want to use the command line interface to manage your preclear sessions, you just need to type preclear on your terminal to start/stop or observe a preclear session.
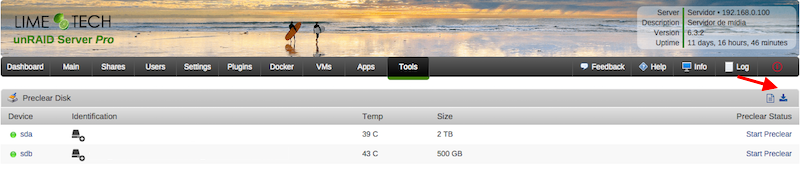 1 point
 -
Hi Guys, This Video is a tutorial on how to setup Rclone on unRAID. You will see how to install it then connect to 3 different cloud storage providers. Amazon, dropbox and google drive. You will see how to encrypt and decrypt files in the cloud. You will see how to connect a docker container to rclone and even stream and encrypted media file to emby or plex. You will then see how to make the rclone mount into a network share. Finally, you will see how to easily sync a folder to the cloud. How to setup and use rclone. Copy sync and encrypt files to the cloud. Even stream media1 point
-
http://www.ebay.com/sch/i.html?_from=R40&_trksid=p2050601.m570.l1313.TR0.TRC2.A0.H0.XE5-2670.TRS5&_nkw=E5-2670&_sacat=0 Only difficulty is going to be finding an affordable socket 2011 board.1 point
-
I making the following request, because without it apps the require IPV6 will cause headaches. A good example is x11vnc, if using x11vnc within an unRAID environment that doesn't have ipv6 built into the kernel, x11vnc causes a buffer overrun.1 point
-
Hi Guys, Apologies if this is not the right forum, now my kids are getting older I want to introduce some security on shares so they cant access our work files etc. I have spun up a windows server 2016 DC as a VM. I was wondering about using this to control access to shares as it woudl then also secure house hold pcs. Not sure if it would work though - how does UNRAID handle active directory - does it need it to boot up or only when people access shares as am congnizent of the face that the VM wont be there when it boots. Any better ideas if this doesn't work? Thanks in advance Stuart1 point
-
Of course not. Real dragons are easy to spot.1 point
-
Those errors are from the docker.img file. However, the ultimate cause is that there are problems with the file system on the cache drive Mar 13 02:05:11 Tower kernel: XFS (sdd1): Metadata corruption detected at xfs_inode_buf_verify+0x92/0xb8, xfs_inode block 0xf17b110 Mar 13 02:05:11 Tower kernel: XFS (sdd1): Metadata corruption detected at xfs_inode_buf_verify+0x92/0xb8, xfs_inode block 0xf17b110 You need to Check Disk Filesystems on the cache drive. If you still have issues, then you will also need to toast and recreate the docker.img file -> All your apps will be unaffected Delete the docker.img file (Settings -> Docker -> Stop the service -> delete the docker.img file -> Renable) Followed by1 point
-
When you New Config, before you start the array you need to make any changes you want to your disk assignments. For example, setting disk14 to unassigned.1 point
-
Whatever you check will be already filled in for you, but you still have an opportunity to change any part of it, so you could just check All1 point
-
Sparkum, it's really important you use the exactly correct command, and it's really important you know exactly what the file system is that you should fix, because if you use the wrong one, you can damage things even worse. All 3 commands you tried above were wrong! This is not the place for trial and error methods. Please, take the time to read the wiki page more thoroughly!1 point
-
Both Amazon and Newegg are offering the Ironwolf Seagate NAS TB HDD for $190 today. https://www.amazon.com/gp/product/B01LZDFMWQ/ https://www.newegg.com/Product/Product.aspx?Item=N82E16822179004 Sale ends today. I'm tempted...I don't really need new drives right now, but this is a pretty good price for a drive designed for NAS use. What's the consensus on these Ironwolf drives from Seagate?1 point
-
It will likely very noisy. May or may not be a consideration.1 point
-
New Config will let you assign your disks however you want. In your case, you want to remove a disk. When starting after New Config, it will normally rebuild the parity drive, and you should let it.1 point
-
I think we're preaching to the choir and saying similar things. Regarding backups, you are 100% right about the need, but many (me included) backup mainly unique works (photos, home movies, documents, etc.). Non-unique works can be recovered or reconstructed (e.g., rescaning BluRays), but would require quite a lot of time and energy. So the choice of what a person backs up remains a somewhat complex formula of risk, cost, time, and criticality. In general, with a few exceptions, people don't have mirror backups of everything. So that makes recovery of the primary storage a priority for everyone. With speed and convenience taking a back seat to avoiding data loss IMO. I tend to assume that a person does not have good backups, having learned that is the most likely. People who do usually say so when the post, and their posts lack that desperate tone. Talking about risk, below are 7 things users should think about to lower risk of loss. Whether that impacts backup strategy is up to each user, but if you do the following, the risk of loss is reduced by 90%, probably more like 99%: 1 - Use of locking cables, and drive cages. These help avoid the absolutely most common problems that users have - which we see nearly daily. 2 - Learning enough about how unRAID works to recover from common issues 3 - Being smart shoppers and buying drives with good reliability ratings 4 - When bumps in the road occur, posting in the forums to get confirmation of recovery steps BEFORE putting two bullets in each foot 5 - Understanding the SMART attributes and monitoring them frequently (at least turning on the notifications) . The thing people don't quite get is that the attributes are like a thermometer. If you are running a high fever, it doesn't usually mean you need Tylenol. Too often people think smart issues are incidents to be overcome, and not symptoms of bigger problems. My rule of thumb - newer drives have incidents, older drives have symptoms. 6 - Staggering disk purchases. I tend to buy 2 identical drives at the same time so my drives have diversity in age and capacity. 7 - Incrementally rotating out old disks and replacing with fresh. At 40,000+ power on hours [for 24x7 users] you really should be thinking about replacement. If a drive gets there or beyond with SMART attributes in good shape, you made a great purchase and should be thinking about transitioning it out and using it for backups. It's probably pretty small compared to current "sweet spot" sizes. My personal approach is that, together with the buying pattern of 2 at a time, I pull out the two oldest (and smallest) drives and replace them with two new new and bigger drives. If do that every year or two I'm keeping my disks fresh and adding new space. I personally think a person's array should be larger (more slots) to allow this type of steady state replenishment plan. Those with no expansion capability and trying to maintain monolithic drive sizes in search of fastest parity checks are costing themselves money and working against a steady state array maintenance process.1 point
-
Built in graphics may come in handy when AMD releases their APU lineup. Thinking mostly mGPU vulcan/dx12.1 point
-
The only thing that can record from a protected channel is Windows Media Center because it has the licenses and the closed recording and playback path. The recordings can be DRM'd the way the providers want so that playback is only possible on that box and no where else. But many cable company's only protect the premium channels like HBO, Showtime... etc. So there are lots of people using SageTV to record from the unprotected channels which might be everything else. There are also cable companies that protect every channel they supply. The only way to tell is to check with other users in your area on the same supplier. You can check some other forums for posts and SiliconDust (HDHR) is also a source of what is available as users have given them channels listings. SageTV as well as Myth, NextPVR can all use the HDHR primes I believe but once again the only software that I know of that will record protected content is Windows Media Center. What I do is use a Hauppauge Colossus card (windows only) or HD-PVR (linux or Windows) with SageTV to record premium channels like HBO from STBs. Only way I know to do it without using Windows Media Center. I don't care for the DRM that would be present that would limit me to that box for playback so I use the analog loop hole that recording in 1080i from a HDPVR allows. Edit just realized you might be able to use the HDHR DVR software to record the DRM'd channels too so that might be an option for you if you don't want to use something like a HDPVR. But I'm sure there are some gotcha's with the HDHR DVR as well I just don't know what they are because I don't use it.1 point
-
A FAQ entry about Cache drive usage options1 point
-
Apparently the toolset used for the H310 and H200 controllers won't do the job with that 1068e chipset! If you followed the whole conversation, that I previously linked for you, between us and ghostboarder, you would have finally come to this post: Now you just need to find out which package @ghostboarder downloaded and use that one! If you're not sure, drop him a pm and see if he can assist in detail.1 point
-
This means sas2flsh.exe can't detect the card. I wonder why. MegaCli seems to get the job done. With the H200 controllers this usually throws the "Exit Code: 0x01" error. Not sure if this is related to the controller or the DOS4GW not working properly with freeDOS. Can you pm me the zipped logs directory with all the logs? @landS Would you please also pm me your zipped logs directory (without the .sbr and .bin files)? Yes, the backups are also done with sas2flsh.exe. I hope there is some info in the Adapters.txt why sas2flsh is not recognizing those card. Maybe an old firmware revision? I experienced this issue the other way round when using the old toolset on the H200 cards. (1b.bat was 1.bat at that time) That would have been 3b.bat. In fact, step 2 is just doing backups. You could have continued with 3b.bat without problems. After the 3b step and a mandatory reboot, sas2flsh should detect the card without issue so that steps 4 to 6 should have worked too. I will point that out in the readme.1 point
-
Got it flashed successfully... after about 15 tries. So, after having MULTIPLE bootable FreeDos images not working with multiple errors, from couldn't find any LSI adapters (right after I see the LSI bios boot, haha) to not enough memory or some other junk. I finally got the FULL FreeDOS 1.2 (tho I removed the games and a few other thing since I didn't have the room for everything I needed). Now I had previously gotten my SAS Address from running 1b.bat.... so had that saved and no need to worry there. Sadly even with the Full 1.2 FreeDOS, the other sas2flash.exe just wouldn't work, wouldn't see my adapter. I ended up getting the larger set of files found in this write-up: https://techmattr.wordpress.com/2016/04/11/updated-sas-hba-crossflashing-or-flashing-to-it-mode-dell-perc-h200-and-h310/ Finally got these 2 commands to work: megarec.exe -writesbr 0 sbrempty.bin megarec.exe -cleanflash 0 I then booted into UEFI through my Bios (the UEFI that was included in the zip file from the above link)... and flashed my bios 3 times (as it seems to be recommended), followed by adding my SAS address back in. Anyway, everything went extremely smoothly this last go. I gotta go pickup my SAS to SATA cables at the amazon locker a few blocks away.... and will test this things out.1 point
-
No. It's being recreated by something other than unRAID itself. Look to your Dockers and VMs for the culprit.1 point
-
DEPRECATED1 point
-
Did you follow the directions exactly when you installed your Windows 7 from scratch? Here is what I did for my 2 32bit Windows 7 VMs: [*]Set the VM to Window 7 / 2008 [*]Put the Win7 32Bit OS ISO image in correct box. [*]Put the virtio driver ISO (virtio-win-0.1.96.iso) in correct box. [*]Setup memory to 3GB (the highest I've found to not cause Windows to use PAE mode) [*]Setup location and size of the boot hard drive and other parameters [*]Start up the VM. [*]When Windows 7 setup stops and give you the empty box where you would pick a drive to install to is where you install drivers. [*]Install the balloon driver (in my case I used Balloon\w7\x86 directory because I'm using 32 bit Win7 even though the instructions tell you to pick AMD64) Windows tells you no drives were found but it DID install the balloon driver. [*]Install the NetKVM driver (once again I used the NetKVM\w7\x86 directory because I'm on 32 bit Win7) Windows tells you no drives were found but it DID install them. [*]Install the vioserial driver (once again I used the vioserial\w7\x86 directory because I'm on 32 bit Win7) Windows tells you no drives were found but it DID install them. [*]Install the viostor driver (once again I used the viostor\w7\x86 directory because I'm on 32 bit Win7) Windows displays the boot drive now to install your OS to. [*]Complete the install of windows. I just setup a 64 bit Win7 and followed the method above except I used Balloon\w7\amd64, NetKVM\w7\amd64, vioserial\w7\amd64 & viostor\w7\amd64 drivers since this was a 64 bit Win7 OS. Boots fine no driver problems with signing. See attached image.
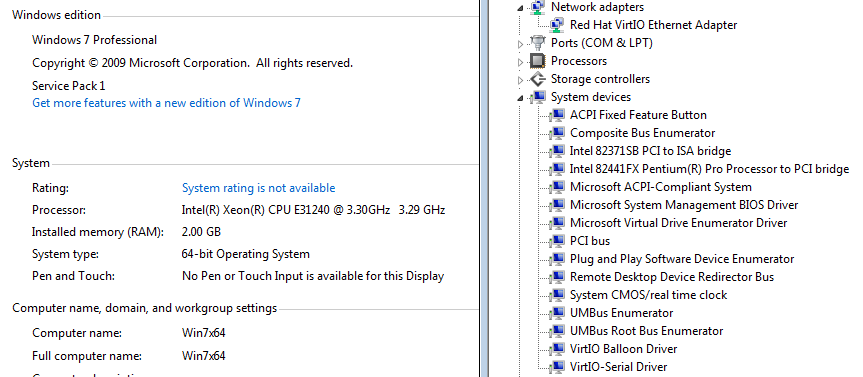 1 point